How to connect to Dynamics 365 service#
Dynamics 365 services require OAuth authentication protocol use as described at Dynamics 365 IT-Pro home page . The additional requirement is to register an application in Azure Active Directory and allow this app to authenticate against a Dynamics 365 instance to get data.
Please follow the steps below to connect to Dynamics 365 with a Custom OAuth Application.
Register an Azure Application#
Follow the steps below to obtain the OAuth values for your application, the OAuthClientId, OAuthClientSecret, and CallbackURL.
Step 1. Log in to Azure Portal#
Log in to Azure Portal <https://portal.azure.com>.
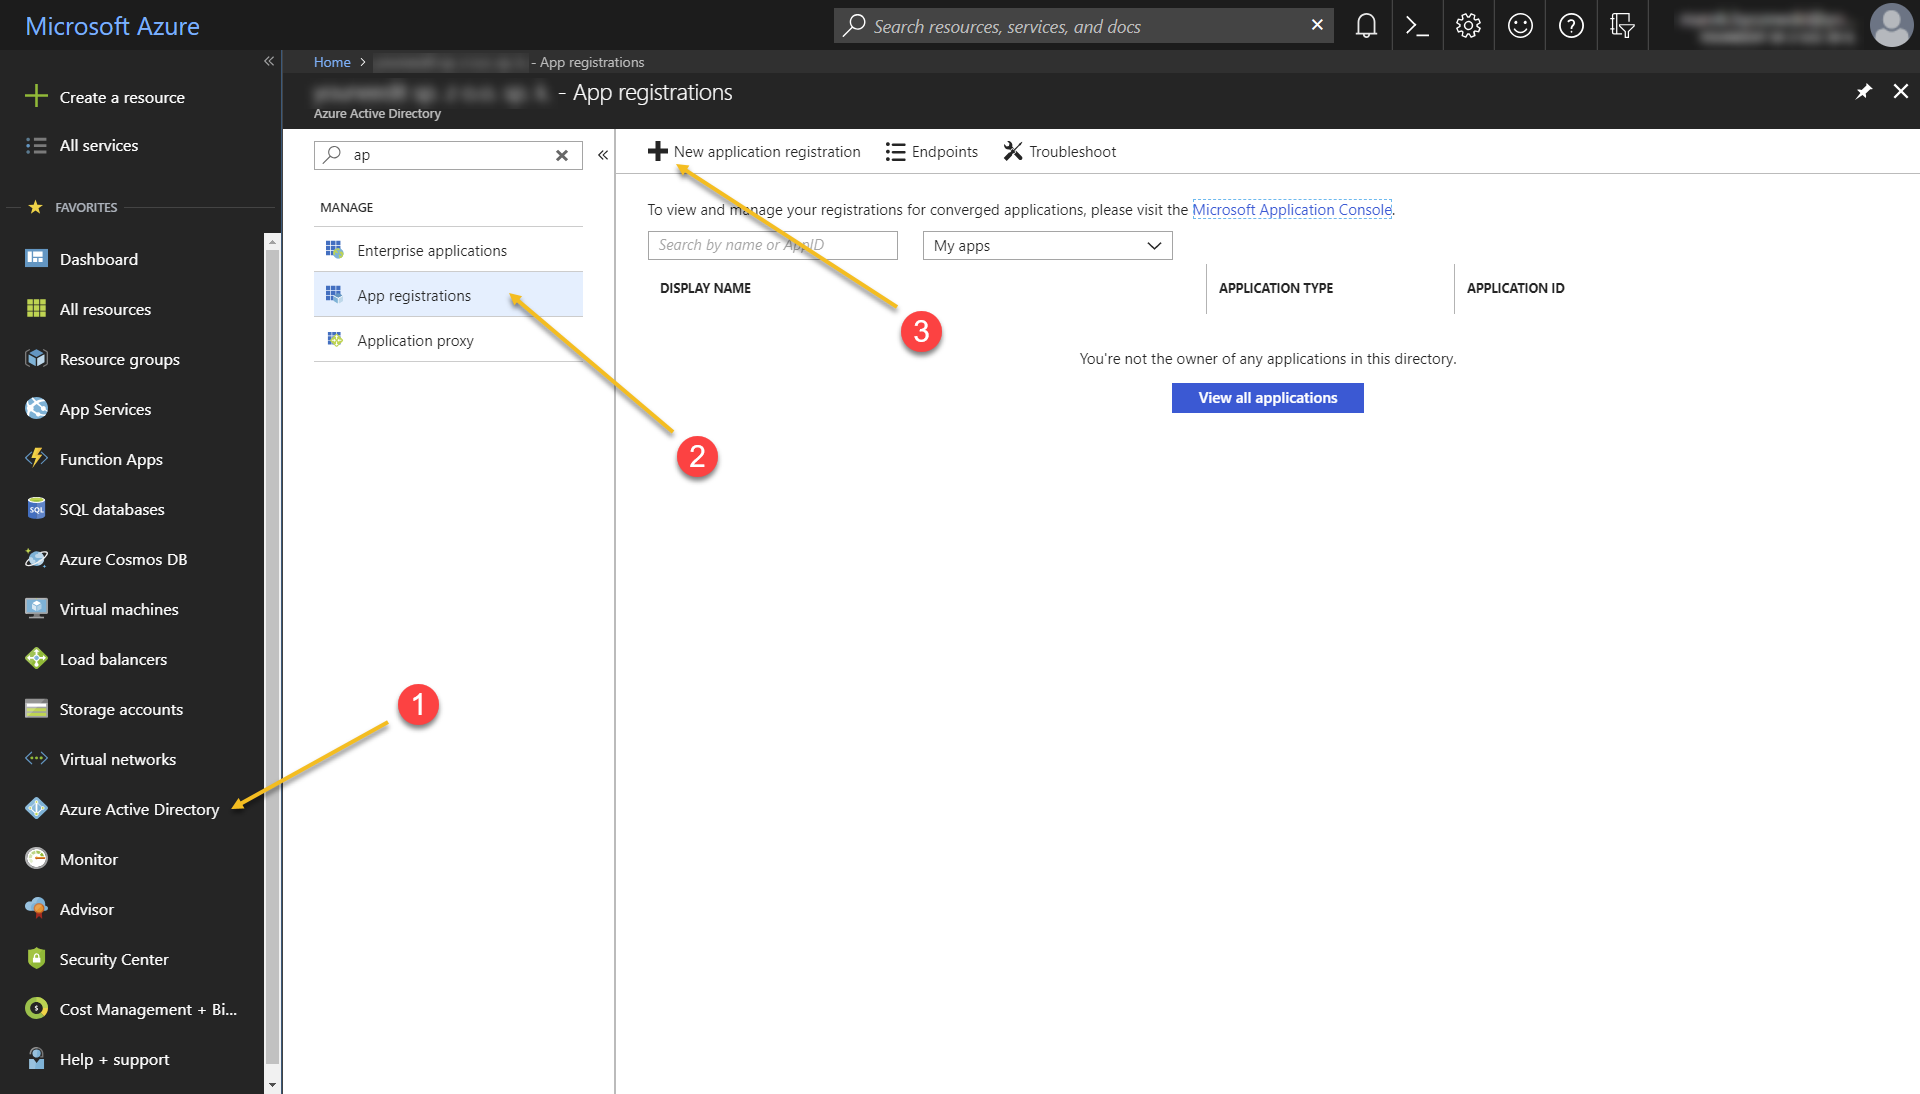
Step 2. Add a new application to Azure Active Directory#
In the left-hand navigation pane, select Azure Active Directory then App Registrations and click the New application registration button.
Step 3. Fill in the properties of the custom app#
Property name |
Value |
|---|---|
Name |
The name of your custom application, for example,**”MyDynamics365app”** |
Application type |
Choose “Web app / API” |
Sign-in URL |
A valid URL. The sign-on URL is not used by the provider or in the authentication step so that it can set to an arbitrary URL like http://localhost:12345. |
Click the Create button.
After creating the app, ensure that in the Properties section, the Multi-tenanted option is set to Yes and Reply URL is set to the URL you chose as Callback URL.
Keep the values of the Application Id and Home page (also known as Sign-on URL) displayed.
Step 4. Create an application key#
Go to the Keys section and create a new key for your app. You can select the option to create a key with a limited duration or one that never expires. After the key is saved, a value for the key is displayed once. Save this value for future use.
Select Required Permissions and then click Add. Under Select an API, select the appropriate application like Microsoft Dynamics ERP or Microsoft Dynamics CRM and grant the required permissions.
Save your changes.
Step 5. Create in Querona a technical connection with basic setup#
Create a connection to the desired Dynamics 365 service. This connection is technical and is not to be used for production. Its only purpose is to allow for the utility stored procedure to work.
Choose a descriptive name, for example, MyDynamics365SalesTechnicalConnection and fill connection properties as described below:
Property name |
Value |
|---|---|
OrganizationUrl |
[ServerName]. Set this to the organization URL of you Dynamics 365 system. |
OAuthClientId |
[Username]. Set this to the client Id / application Id displayed for the app you created in Azure. |
OAuthClientSecret |
[Password]. Set this to the value of the key you created in Azure. |
Note
We recommend to enable a high logging level to obtain a detailed information about errors raised by the provider. To set up logging please configure the LogFile and Verbosity properties, for example, “LogFile=c:\Logs\dyn365log.log; Verbosity=4;””
Save the changes and keep the connection name for future use.
Step 8. Get the OAuth access token and refresh token#
In Querona go to Query and execute the qua_get_oauth_access_token_d365 stored procedure supplied with the proper parameters:
EXEC [qua_get_oauth_access_token_d365] 'MyDynamics365SalesTechnicalConnection'
                                     , 'http://localhost:12345'
                                     , '<paste here the value of _code_ parameter from previous step>'
                                     ;
The stored procedure returns a result set from which you need to copy the values of OAuthAccessToken and OAuthRefreshToken.
Step 9. Create and configure a new connection to Dynamics 365#
Create a connection to selected Dynamics 365 service using the dedicated provider and set the following properties:
Property name |
Value |
|---|---|
OrganizationUrl |
[ServerName]. Set this to the organization URL of you Dynamics 365 system. |
OAuthClientId |
[Username]. Set this to the client Id / application Id displayed for the app you created in Azure. |
OAuthClientSecret |
[Password]. Set this to the value of the key you created in Azure. |
OAuthAccessToken |
Set this to the value of the OAuthAccessToken obtained in the previous step. |
OAuthRefreshToken |
Set this to the value of the OAuthRefreshToken obtained in the previous step. |
InitiateOAuth |
REFRESH |
That concludes the configuration of connection to Dynamics 365. You may now Create a virtual database over the newly created connection.