Install Querona#
Make sure to review Requirements and compatibility and Installation prerequisites. It is assumed at this stage that prerequisite requirements are met.
Step 1. Start the installation by running the MSI package#
Welcome window appears.
Click Next.
Step 2. Read the license text and if you agree, accept the license#
You may install Querona only after you accept the license. If you agree click Next, otherwise click Cancel to abort the installation.
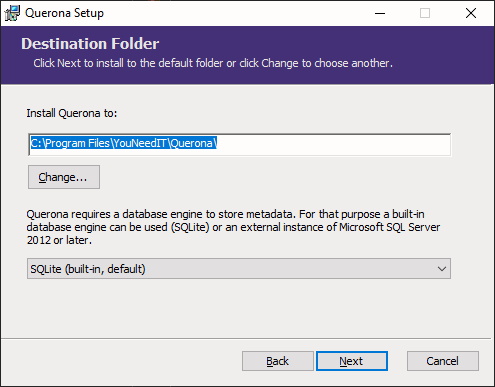
Step 3. Select destination folder and metabase hosting database engine#
Note
We assume the selection of the MS SQL Server engine. If SqLite engine is selected, skip Step 4.
Step 4. Provide database server name#
Note
The deployment of metadata databases to different servers is not supported by the installer. All databases need to be installed on the same machine.
Provide database server name you want to host Querona metabase and Spark metastore databases on.
Warning
Do not enter “(local)” alias for local Microsoft SQL Server database, because it will break configuration of Apache Spark. For local database always use localhost with optional instance name like localhost\myinstance.
Click Next.
Step 5. Provide configuration of the Windows service#
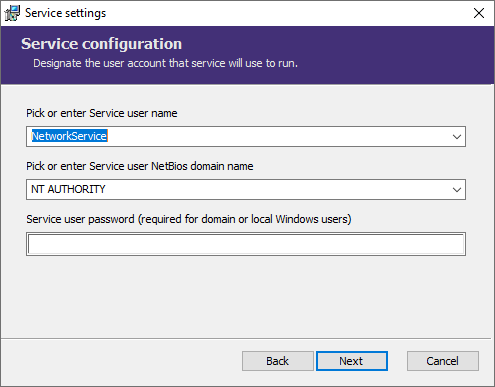
Please choose the proper settings using the table below:
Domain |
Account |
Password |
Description |
|---|---|---|---|
NT AUTHORITY |
NetworkService |
not required (leave empty) |
The NetworkService account is a predefined local account used by the service control manager. It has minimum privileges on the local computer and acts as the computer on the network. This account does not have a password, so any password information that you provide is ignored. A service that runs in the context of the NetworkService account presents the computer’s credentials to remote servers. By default, the remote token contains SIDs for the Everyone and Authenticated Users groups. |
NT AUTHORITY |
LocalService |
not required (leave empty) |
The LocalService account is a predefined local account used by the service control manager. It has minimum privileges on the local computer and presents anonymous credentials on the network. This account does not have a password, so any password information that you provide is ignored. |
Machine name |
<custom local user> |
enter local user password |
Local user account created on machine you install on. |
Domain name |
<custom domain user> |
enter domain user password |
Domain user account from your company domain. |
Two scenarios are common for choosing the service account:
Scenario |
Description |
|---|---|
Local computer Network Service (NT AUTHORITY\NetworkService). |
To authenticate using computer account pick NetworkService as service user name and NT AUTHORITY as NetBIOS domain name. A password is not required and ignored if entered. |
Designated Active Directory user (NETBIOS_DOMAIN\user_name), for example CONTOSO\queronaSvc. |
To authenticate using designated AD user, pick domain from the list or enter domain name manually, then enter the user name and provide password designated for the user name entered. |
Click Next.
Service user name and password will be validated against Active Directory (AD) or local store respectively. In case you provide wrong credentials, an error message will be displayed:
Click Ok and correct credentials entered until validation passes.
Step 6. Configure instance parameters#
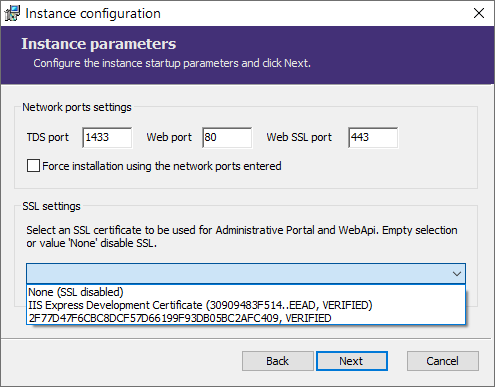
Provide custom TDS port, Web port, and Web SSL port, or accept the defaults. Installer will verify that designated network ports are available. If any of the port is in use, a warning will appear. Port availability check can be skipped by ticking the check box Skip network port “in use” check during installation.
Installer loads all certificates from the Local Machine certificate store, verifies them, and presents in a dropdown list. If a friendly name is available, it will be used in a drop down list along with the first twelve and last four characters from the certificate thumbprint. Otherwise, a certificate thumbprint will be presented in full. Certificates that passed the X.509 chain validation are marked as “VERIFIED”.
If you require Secure Sockets Layer (SSL) to be enabled, select certificate from the SSL settings dropdown list. If you do not select a certificate or select ‘None’, the SSL support will be disabled.
Warning
The selected certificate has to have a private key. We recommend to choose from the verified certificates. Certificates that do not pass verification may not work. In such a case, you may not be able to connect to Querona Administrative Portal over SSL even if installation is successful.
Click Next.
Step 7. Configure Spark#
Provide custom Spark settings, or accept the defaults.
The following settings can be configured:
Setting |
Description |
|---|---|
Spark warehouse folder |
Warehouse folder is the base directory where directories related to databases, tables go by default. Corresponds with Spark’s parameter spark.sql.warehouse.dir |
Temporary “scratch” folder(s) |
Folder or a comma-separated list of folders (can be on different disks) to use for “scratch” space in Spark. This should be on a fast, local disk(s) in your system. |
Spark Web GUI port number |
Port number where Spark will host its Web GUI. This GUI is available only from localhost and does not require authentication. |
Click Next.
Step 8. In the confirmation dialog click Install and allow for privilege elevation#
A progress windows will appear. Wait for the installation to finish.
When the installation completes successfully click Finish.
Log on as administrator#
Launch Web Administrative portal by navigating to http://localhost, assuming you are logged on to Querona Windows server using Remote Desktop.
Provide administrative credentials to log in. By default, all users that belong to local Administrators group on a machine hosting Querona, have administrative privileges. If you want to logon using built-in credentials, use the default user/password: admin/admin. Default behavior and security settings can be changed using Querona Administrative Portal, as described in Configuration section.
Follow the steps described in Post-installation configuration section.