Adding a view#
This chapter describes the steps required to create a view for the virtual database. You can define a view always in the context of the previously selected virtual database. Please go to Managing the database for further assistance.
Select the database, then click ADD VIEW in the upper-right corner to open the wizard. The screens below cover each view type (Custom SQL, Union, Join).
Define the view with a SELECT:
CREATE VIEW dbo.ActiveProduct AS
SELECT Id, Name, Price
FROM   dbo.Product
WHERE  Discontinued = 0;
See CREATE VIEW.
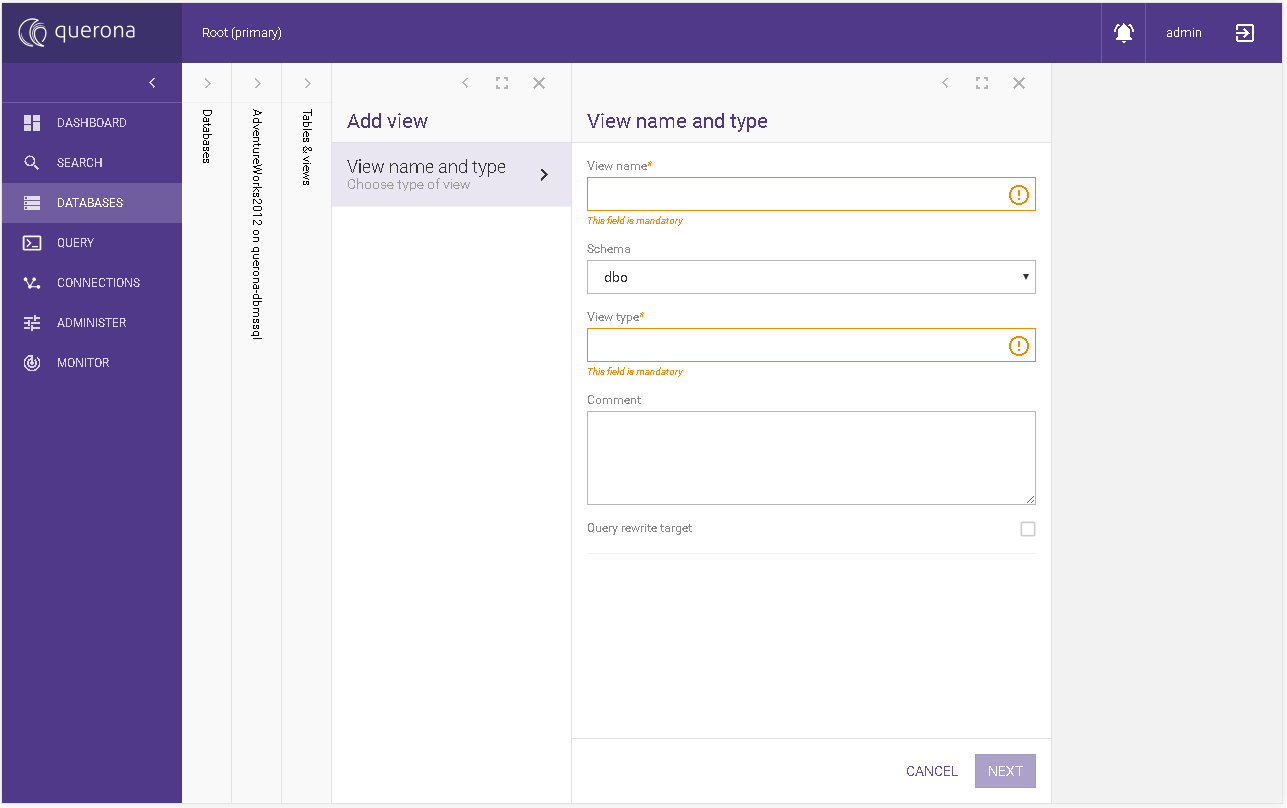
View name and type#
This section represents basic information about the view. Depending on the selected View type the wizard changes its steps.
Parameter |
Required |
Default value |
Description |
|---|---|---|---|
View name |
Yes |
Specifies the view name. |
|
Schema |
Yes |
dbo |
The schema name in which the view will be placed. |
View type |
Yes |
The view type. We support: `Custom SQL`_, `Union view`_, `Join view`_. |
|
Comment |
No |
The comment text. |
|
Query rewrite target |
Yes |
No |
Enables rewriting the queries. See Query Retargeting |
Owner login |
No |
User’s login |
Login of a user that is the owner of the view. |
Available actions:
CANCEL - it prompts for canceling the operation and if approved, goes to the Managing the database of the selected database.
NEXT - it goes to the next wizard screen.
Custom SQL#
On the screen, you can type any SQL query to create a view definition. Before proceeding, you must use the PARSE button to check if your query is valid. Initially, both NEXT and CREATE buttons are disabled, any change in the SQL text area disables them.
Available actions:
PARSE - it parses the current query from the SQL text area.
CANCEL - it prompts for canceling the operation and if approved, goes to the selected database screen.
NEXT - it goes to the next wizard screen.
CREATE - it creates the view and goes to Managing the database of the selected database.
Union view#
This step enables to define a view based on a one of following set operators:
UNION
UNION ALL
EXCEPT
INTERSECT.
By default, the selected set operator is UNION ALL.
The Union view has to be defined with at least one table or view.
Choosing the JOIN object#
On the left-hand side, there is a Databases section where you can find tables or view either by expanding each node or using the search box. Typing the text into the search box immediately looks for any table or view name matching the search phrase and expands the tree to show the found elements. The found phrase is marked yellow on matching object.
Working with the editor#
Each object you want to include into a view you shall drag&drop into the row with the text drop table here that appears on the left-hand side. To remove the table from the sources click on Remove text in the Action column (the last one).
When you drop the first table all columns from it will be added to the output column list and will be selected as a default source. For the next objects, you have to select which column is to be presented by specifying it from the available column list. You can add another column by clicking ADD COLUMN button. In order to remove use Remove column icon.
You can specify Filter predicate statement that is to be appended to respective source table to filter out the data set.
Any change on the screen in any text box or column drop down list disables the NEXT and CREATE buttons. Each time you must PARSE the view to be able to continue.
Available actions:
CANCEL - it prompts for canceling the operation and if approved, goes to the selected database screen.
PARSE - it parses the current query based on the provided values.
NEXT - it goes to the next wizard screen.
CREATE - it creates the view and goes to Managing the database on the selected database.
Join view#
It is a step that enables to write a view that is using a JOIN statement. The designer supports drag&drop functionality. By default, Querona uses INNER JOIN statement and tries to match the JOIN conditions.
Supported JOIN types are:
INNER
LEFT
RIGHT
OUTER.
Choosing the JOIN object#
The first object should be dragged into any place in the Edit join surface. Any other joined table or view has to be dropped on the other’s object box header.
The JOIN view has to be defined with at least one table or view.
JOIN editor#
When you click on two circles between two joined objects the JOIN editor appears. In the upper section, you select the type of join to be used. In the middle section, there is a list of columns that should be a subject of a join between Source and Target objects. You can add more columns by pressing Add clause.
In order to remove the columns set use … (3 dots) in the right hand side of each row. You can select only from the available columns from the list. Columns without selection will stay marked with the red border.
Object editor#
By default, all columns from dragged objects are marked to be an output of the view. You can deselect them by unchecking the purple tick icon in the corresponding row. Every column by default has an alias that name is equal to the source object column name. In order to change that, expand the row with the down-arrow control and adjust the alias name.
When you want to collapse or expand columns, use the up/down arrows in the header box. In order to reject the object from the join, click the close icon.
View SQL#
This section appears when you chose the Union view or Join view view type. It represents a SQL query generated by the wizard. The field is read only.
Available actions:
CANCEL - it prompts for canceling the operation and if approved, goes to the selected database screen.
NEXT - it goes to the next wizard screen.
CREATE - it creates the view and goes to Managing the database on the selected database.
Columns#
It presents the summary of the output columns used in the view in the table:
Column name |
Description |
|---|---|
Column name |
The view’s output column name. |
Type |
Type of the column with the nullability information. |
CANCEL - it prompts for canceling the operation and if approved, goes to the selected database screen.
CREATE - it creates the view and goes to Managing the database on the selected database.