

Managing tables#
This section describes how to manage existing tables.
Summary#
To access the details of a particular tables go to on the Tables & views screen pick a table (notice the Type column).
The table summary screen should appear:
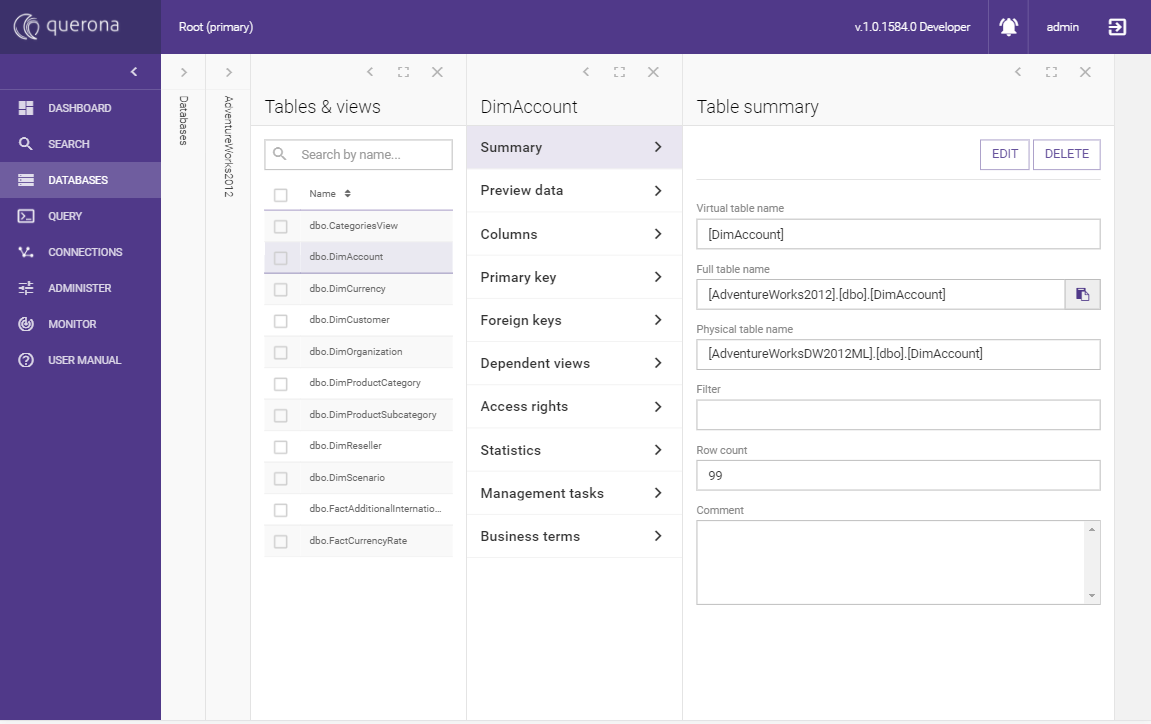
The following table summarizes the visible properties:
Parameter |
Description |
|---|---|
Virtual table name |
The name of the table visible to TDS clients. |
Full table name |
Same as above but database and schema qualified |
Physical table name |
Database and schema qualified name of the table in the underlying data source. |
Filter |
An arbitrary SQL WHERE condition that will be applied to all queries related to this table, e.g. AccountKey = ‘777’ |
Row count |
Number of rows stored in the physical table. |
Last read |
When a statement last read the table. |
Last write |
When a statement last wrote to the table. |
Last statistics calculation |
When the statistics of the table were last calculated. |
Writes since statistics |
How many writes the table has taken since its statistics were calculated. |
Comment |
The comment text. |
Note
The usage dates are empty until the Engine observes the first statement of that kind, and counting starts
when object usage tracking is installed rather than when the table was created. Engine housekeeping is not
counted: refreshing a materialized view does not make its source tables look read, and calculating
statistics moves the statistics date rather than the read date. The dates and counts also need the
VIEW SERVER STATE permission, the same one sys.qua_table_usage asks for over SQL; they are
empty for a user without it.
Clicking Edit enables the “Edit table” screen where most of above values can be set:
Clicking Delete brings up the table removal screen.
Preview data#
This screen browses the rows of the table. Press Preview to read the first page from the source; nothing is read until you do. Once rows are on screen the same button reads them again and is labelled Refresh - it is one control, named by what it would do now.
The rows-per-page list is the number beside the caret at the right of the action row; it sets how many rows a page holds - 50, 200 (the default), 500 or 1000. Changing it starts again from the first page.
Available actions:
Preview / Refresh - reads the first page, and from then on reads the rows on screen again.
Cancel - stops the read that is running.
Back / Next - move between pages. Pages follow the primary key, so there is no total row count and no jump to an arbitrary page.
Filter - opens a window in which one condition is composed. See Filtering below.
The information icon at the right of the action row, beside the rows-per-page list, opens what Querona knows about this data set. It lists, one sentence per line: whether the rows can be edited and, where they cannot, why not; whether rows can be added and, where they cannot, why not; whether rows can be deleted and, where they cannot, why not; whether the table is paged by its primary key - naming the key columns - or can only be read as far as its first rows, again with the reason; the column concurrent changes are detected through, when the table stamps a rowversion; and the columns the source assigns itself, such as an identity, a computed column or a temporal period column.
Editing, adding and deleting are stated separately because they are decided separately: they rest on different permissions and on different statements of the source, so a table can allow any combination of the three.
A table with no primary key, one whose key accepts NULL, or one whose key column has a type that cannot carry a cursor is browsed differently - only the first rows are read, and a note under the grid says so. Such a table is still filtered like any other; what needs a primary key is paging beyond the first rows, and editing.
Clicking a row opens it column by column. The row opens read-only; Edit turns it into a form, and Save writes exactly the columns you changed. If somebody else changed the row in the meantime, the save is refused and you are shown both versions to choose between. Columns the source maintains itself - an identity, a computed column, a rowversion, a temporal period column - are shown but cannot be edited, with the reason beside them.
Filtering#
Filter sits in the action row, after the paging buttons, and appears once the table’s structure has been read. While conditions are in force it carries their count as a badge, and the conditions themselves are listed as chips in a line above the grid.
Pressing it opens the Add filter criterion window, which composes one condition:
Column - the column to ask about. Every column of the table is offered.
Comparison - the comparisons that column’s type allows.
Value - a box for a comparison that takes one; a date column also offers a calendar, and a
bitcolumn offers True and False instead. The two NULL comparisons take no value, so no box is shown for them.
Apply puts the condition in force and reads the table again; it stays disabled until the window states a whole condition. Cancel closes the window and applies nothing.
Each chip in the line above the grid has its own remove control, and Clear all at the end of the line withdraws every condition at once.
Criteria are combined with AND, up to 20 per page request.
The comparisons a column offers follow its type:
A comparable type (numbers, dates, and most other types) offers equals, does not equal, is less than, is less than or equal to, is greater than, is greater than or equal to, is NULL and is not NULL.
A text type adds contains, starts with and ends with.
bitoffers only equals, is NULL and is not NULL.image,text,ntextandxmloffer only is NULL and is not NULL - the source refuses any other comparison on these types.
Contains, starts with and ends with are SQL LIKE matches: % stands for any run of characters
and _ for exactly one character. A % or _ typed into the value is read as that wildcard,
not as a literal character.
Applying, removing or clearing a criterion reads the table again from its first page: the row range starts over and the page trail built so far is discarded. A filter that is applied stays in force for every page read while it stands, including Refresh.
Filter is disabled while a page is being read or a row is being saved, and once 20 conditions are in force. Point at it to read why it will not open.
Filtering works on any table, including one browsed with only its first rows: there the criteria narrow which rows make up that head, and the note under the grid still states how many rows at most were read. Paging beyond the first rows and editing are what need a primary key; filtering does not.
A value typed into the filter is sent to the source as a parameter; the grid never builds SQL text out of what is typed.
Note
A text comparison is evaluated by the data source holding the rows. On a table backed by several
sources, each source applies its own collation, so a comparison such as equals 'ACME' can match
a stored Acme on one source and not on another. Querona does not alter a source’s own comparison.
Adding a row#
New row sits in the action row and opens an empty form for a row that does not exist yet.
It is available once all of the following hold. The information icon in the action row states whether the object accepts new rows, and the button’s own tooltip states why it is unavailable when it is:
The object is a table and its source accepts an
INSERT.The table has a primary key that addresses a single row, and one that can be stated when the row is written. A key that accepts NULL, one whose column type cannot carry a value back, and one with a component the source fills in silently - a computed key column, say - do not. An identity key does: the source hands back the value it generated.
You hold both INSERT and SELECT on the table. SELECT is needed because the new row is read back after it is written.
Browsing has started. The insert runs on the same source connection the grid browses on, so press Preview first.
Every column of the form starts with no value at all, which is not the same as NULL: a column left that way is left out of the statement entirely, so the source’s own default, sequence or trigger decides what it holds. Typing a value, choosing NULL or picking a date gives the column a value; Leave unset puts it back to having none. Clearing the box by hand does not - that leaves the empty string, which is a value the source will store. At least one column has to be given a value: a row made only of the source’s own defaults is not something this screen writes.
Two kinds of column are treated differently:
Every primary key column the source does not assign itself must be given a value. Save stays disabled until they all have one, with the reason stated beside it, because the new row is read back by its key.
Columns the source assigns - an identity, a computed column, a rowversion, a temporal period column - are shown but cannot be filled in. The source sets them as it writes the row.
Save writes the row and reads it back. What happens next depends on what the source reports:
The row is shown as the source now holds it, with the values it assigned, and the list behind the form is refreshed.
On a source that does not hand the inserted row back, the row cannot be shown. You are told that the insert went through but is not on screen, the list is refreshed, and the form closes.
On a source that reports no row count, the insert can be neither confirmed nor denied. You are told so. If the source handed the row back it is shown; if it did not, the form is left as you filled it in, so nothing has to be typed again.
If the source reports that no row was inserted, you are told so and the form is kept as you filled it in, so it can be corrected.
If the source refuses the write - a duplicate key, a constraint it will not let you break - the message it gives is reported, against the column it names where it names one, and the form is kept.
The new row is not necessarily on the page you are looking at. A row lands wherever the table’s key order puts it, so it can be on any page, and the list is refreshed rather than scrolled to it.
Cancel closes the form. If anything has been filled in, you are asked first.
Deleting a row#
Delete sits in the row’s own screen, between Close and Edit. It removes the row you are looking at; it is offered while the row is being read, not while it is being edited, and never on a row that does not exist yet.
It is shown only where the object accepts a delete: the source has to support a DELETE, the table
has to have a primary key that addresses a single row, and you have to hold both DELETE and SELECT on
it - SELECT because the row is read back to confirm what happened to it. The information icon in the
action row states whether rows can be deleted from this object, and why not where they cannot. The
button is disabled, rather than hidden, while something is in the way that will pass: a statement of
this screen’s already running, a page being read on the same connection, or a decision still open
below.
Two things disable it that will not pass, and there the button carries the reason: a table with no column a delete can be guarded by, and a row whose primary key this screen was not given in full. Both are about the statement rather than about your permissions - one leaves nothing for the source to compare the row against, the other leaves nothing that addresses exactly one row - so the delete is refused here rather than sent and refused later.
Pressing it asks first, and the question names the row by its primary key - Delete the row where
OrderID = 10248? - so it is clear which row is about to go. The delete cannot be undone from here.
The row is deleted only if it is still the row you read. Querona sends the same guard a save of it would send - the table’s rowversion where it stamps one, otherwise the values the row was read with - so a row somebody else has changed in the meantime is refused rather than removed. You are shown what changed, column by column, and offered two ways out:
Delete anyway - the row goes as it now stands. It asks the same question Delete asked, because it is the same statement about the same row. The change you were just shown becomes what the second attempt is guarded by, so it is the row on screen that is removed.
Keep the row - nothing is deleted, and the screen goes back to reading the row as the source now holds it.
The list of changed columns can be empty, and that is an answer rather than a screen that failed to load: on a table that stamps a rowversion the guard moves on any write at all, and the columns that did change can be ones this screen does not show. The row moved; what moved in it is simply not visible from here.
When the delete goes through you are told so, the row disappears from the list behind the screen, and the screen closes. Two other answers end it the same way: a row that was already gone from the source - somebody else deleted it first - and a source that reports no row count, which can neither confirm nor deny the delete; you are told which of the two happened, and the list is what will show whether the row went.
The source can refuse the delete on its own terms - a foreign key pointing at the row, a trigger that will not allow it. The message the source gives is shown as it stands, and the row stays on screen.
Stop stops the statement while it is running, exactly as it does for a save. A statement that already reached the source has already run, so nothing is claimed about it: the row is read again and you are told what was found - that it is no longer at the source, that it is still there, or that it could not be read again and the outcome is therefore unknown.
While the delete is running the screen cannot be closed. Close is disabled, the screen’s own close button refuses, and so does closing the list behind it - leaving would take you somewhere that can neither tell you what the statement did nor stop it, over a row whose fate is still open. Stop is the way out, and it is on the same row of buttons.
Columns#
Clicking this tab will bring up the Columns list screen:
The following buttons can be used:
Add column#
Add column opens a screen for mapping an existing physical column to a virtual column:
The following table summarizes the properties:
Parameter |
Description |
|---|---|
Virtual column name |
The name of the column visible to TDS clients. |
Physical column name |
The name of the physical column in the underlying data source. |
Virtual column type |
The data type of the column visible to TDS clients. |
Physical column type |
The data type of the underlying physical column. |
Comment |
The comment text. |
Data masking formula |
See below. |
Nullable |
Defines whether the virtual column allows NULLS. |
Data masking formula
This field allows to arbitrarily change the data returned for this column. Basically, this can be any valid SQL expression, e.g. a function call, CASE expression etc. Any column from the containing table can be referenced as well.
As an example, the following expression can be used to limit the [Salary] column visibility only to HR managers:
case when is_rolemember('HR manager')=1 then [Salary] else null end
Warning
Please keep in mind that the is_rolemember function call is evaluated in the context of the current user. This might lead to problems when the [Salary] column would be used in a materialized view because materialization is performed by the System user. Is such case the resulting table might have 0 rows.
Add calculated#
Add calculated opens a screen for a defining a new calculated column.
The following table summarizes the properties:
Parameter |
Description |
|---|---|
Virtual column name |
The name of the column visible to TDS clients. |
Virtual column type |
The data type of the column deduced from the Read Formula. |
Comment |
The comment text. |
Read Formula |
A SQL expression that will be evaluated for every row to return the final value. |
After filling the Read Formula field, click Parse to validate the expression and deduce the column type. Use CAST if necessary. E.g. the following expression returns decimal ones:
cast (1 as decimal)
Column preview#
When on clicking a given column on the columns list a preview screen appears.
The first section contains a read-only preview of properties as described in above. Scrolling down allows to access the following screens:
Preview data#
Similarly to table data preview, data only for a given column can be viewed. The advantage here is that previewing distinctive data (and with count) is also possible.
Access rights#
Please go to the Access rights section for general information about access rights. Table column access rights are listed below:
Access right |
Description |
|---|---|
Select |
Confers to the grantee the ability to select the data. |
Update |
Confers to the grantee the ability to update the data. |
View definition |
Enables the grantee to access column metadata. |
Primary and Foreign keys#
Please refer to the Primary and Foreign Keys chapter of the manual.
Dependent views#
When selecting this section, a list of all views that depend on this object appears. Clicking one of them opens the Dependency graph screen, with the object being high-lightened.
Clicking the bar expands the list of columns. Clicking a column highlights all source columns in other objects.
Access rights#
Please go to the Access rights section for general information about access rights. View access rights are listed below:
Access right |
Description |
|---|---|
Alter |
Confers to the grantee the ability to alter table. |
Alter table |
Confers to the grantee the ability to change table attributes. |
Control |
Confers to the grantee the ability to table definition and control database access rights. |
Control table |
Confers to the grantee the ability to table definition, alter, control table and create table access rights. |
Delete |
Confers to the grantee the ability to delete the data. |
Insert |
Confers to the grantee the ability to insert the data. |
Select |
Confers to the grantee the ability to select the data. |
Update |
Confers to the grantee the ability to update the data. |
View definition |
Enables the grantee to access database metadata. |
Statistics#
Shows the statistics for the table. This screen is in read only mode. When you want to adjust the statistics manually please click EDIT button. On the screen, you can see the Use approximate distinct count option to improve the performance of statistics calculations with negligible deviation from the exact result. View row count shows how many rows are present in the table. For each column, you can examine the statistics in the following table:
Column name |
Description |
|---|---|
Column name |
The virtual column name. |
Distinct count |
The number of the distinct values in the virtual column. |
Average length bytes |
The average length of columns where the bytes length can be calculated, for instance, character columns. |
Calculate statistics |
Specifies if the calculation of the column statistics should be performed and how. |
To refresh the statistics you can use the Management tasks section.
Available actions:
EDIT - goes to the edit mode screen.
Edit statistics#
This screen allows you to modify statistics related values. It is the same screen as described above, but with editing capabilities.
Management tasks#
Please refer to the Management Tasks section.
Tags#
Please refer to the Assign tags section.